We wrote on how to create a Facebook Profile. Today we will show you step by step about how to Create a Group on Facebook. You may use two facebook accounts, one for personal use and the other for business purposes.
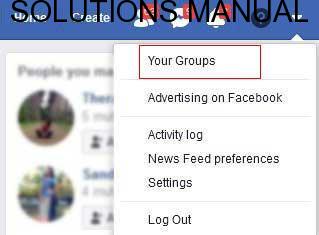
First go to your Facebook and sign in with your Email & Password. Now click on the down arrow in the top right. Select “Your Groups” from the menu.

You’ll be taken to the Groups page. Select “Create Group” Button on the top left side of the page. Below box will appear and you’ll have to fill in the details for your group.

Follow the steps below:
- Name your group with an eye catching and easy-to-remember name.
- Add some of your friends or all of them to your group.
- Select Privacy as, Public or Private. If you select public, the posts will be visible to all the facebook users. A private group’s posts will be visible only to the group members.
- You can hide the group from the outer world, by using “Hide Group”. Choose between visible and hidden. A hidden group can not be found using the facebook search.
- You can easily access your group by marking “Pin to Shortcuts”. A shortcut to your group will appear next to your facebook posts area. So that you can easily access your new group.
- Click on “Create”. Now you have a facebook group!
How to Personalize your facebook group with few easy steps
- Personalize your group by selecting a cover photo. Choose from the photos you already uploaded or upload it from PC.

- You can add members to the group by entering their names or emails.

- Add a group description and tell people the purpose of this group. You may add a location too.

Today we explained how to create a group on facebook as well as ways to customize a facebook group. We encourage you to share the knowledge with your friends by sharing our post on social media.