How to Create a Group on Facebook with few easy steps

how to make a facebook group

We wrote on how to create a Facebook Profile. Today we will show you step by step about how to Create a Group on Facebook. You may use two facebook accounts, one for personal use and the other for business purposes.

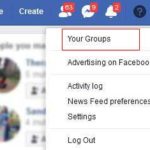
First go to your Facebook and sign in with your Email & Password. Now click on the down arrow in the top right. Select “Your Groups” from the menu.

how to make a facebook group

You’ll be taken to the Groups page. Select “Create Group” Button on the top left side of the page. Below box will appear and you’ll have to fill in the details for your group.

How to Create a Group on Facebook

Follow the steps below:

  1. Name your group with an eye catching and easy-to-remember name.
  2. Add some of your friends or all of them to your group.
  3. Select Privacy as, Public or Private. If you select public, the posts will be visible to all the facebook users. A private group’s posts will be visible only to the group members.
  4. You can hide the group from the outer world, by using “Hide Group”. Choose between visible and hidden. A hidden group can not be found using the facebook search.
  5. You can easily access your group by marking “Pin to Shortcuts”. A shortcut to your group will appear next to your facebook posts area. So that you can easily access your new group.
  6. Click on “Create”. Now you have a facebook group!

How to Personalize your facebook group with few easy steps

  • Personalize your group by selecting a cover photo. Choose from the photos you already uploaded or upload it from PC.
  • You can add members to the group by entering their names or emails.
  • Add a group description and tell people the purpose of this group. You may add a location too.

Today we explained how to create a group on facebook as well as ways to customize a facebook group. We encourage you to share the knowledge with your friends by sharing our post on social media.

How to create a Gmail Account with few easy steps

Gmail is a one of the biggest E-mail service provider proving service form 1st April 2004 offering 1 GB inbox space for per account holder. Now, I will show you, how to create a gmail account easily. Creating a Gmail Account is very easy and you have to follow step by step direction.

  • First Go to www.gmail.com and Click the blue marked Create Account section and the registration page will show after.
How to create a Gmail Account
  • After Clicking on signup section, a registration form will be shown having title Create your Google Account.

Create your Google Account

1. Name: Here In the Name Field you have to provide your first name and last name. Like if your name is John Clark, then John is to be consider as first name and Clark as last name.

2. User ID: Now You have to choose a Nice User ID matching your name.  If your name is John Clark then you may use “[email protected]” as your user id. But it’s difficult to get such user id. One can only use one user id. If you choose a user id, then nobody can be create any time with the same user id. But if you see that, your chosen  id have already been taken by any other then you may use any number with your id like “[email protected]”.

3. Creating Password: Password is the key to your email address and need to enter password each time when you will “Log in” in your email address. Gmail account needed 8 character password. Somebody use alphabet, somebody use numbers. But Password become more strong if you use both of them like “mike12345″. If you use these [%*^] in the password section then it will be more effective that nobody can hack your password easily.

4. Verify your phone number if you’re asked to do so.

5. Enter your mobile number and an email address of yours. In case of account recovery, google use this information.

6. Enter Date of Birth and select gender and click next.

7. Read the Privacy and Terms and click Agree to continue.

8. You’ll be take to your my account page and then you can browse to your gmail account you just created.

How to Use Multiple Facebook Accounts on Android devices

Facebook is the king of all the social media apps, nothing can beat its popularity and functionalities. Not even Google Plus couldn’t beat facebook, which was a failed project and was discontinued in April, 2019. Over billion active users use the facebook app monthly and facebook is not only for photo sharing but also to communicate with groups or individuals, and as a business platform.
Having multiple facebook accounts is important for those who maintain a separate business account and a personal account. However, facebook do not allow you to have multiple accounts on a single android device. It is time consuming to login and out from different devices when needed.
Still there are ways to bypass this restriction, using these tricks you don’t have to deal with login back and forth.

Apps to Run Multiple facebook accounts in one android phone

Parallel Space

Parallel Space support not only facebook but other social media accounts as well. It’s like a separate app space. Parallel Space stores user cache separately from the main account. So that you can login to both accounts simultaneously, it hides the app from the device using the incognito feature.

How to use two facebook accounts using Parallel Space on android is simple.

  1. Open Google Play and install Parallel Space.
  2. Open Parallel Space and tap on facebook and login to your second facebook account.
  3. You can easily add as many apps as you want.

2Accounts: Multi User Switch

Just like the previous app, this allow you to use two facebook accounts on one android device. There will be no storage conflicts between the two accounts. There are more features such as two different game modes and security lock to protect your privacy.

In order to run multiple facebook accounts on your android device using this app,

  1. Browse the google play store and install 2Accounts: Muti User Switch
  2. Open the application and mark the check box for facebook.
  3. Enable virtually clone the app.
  4. To use another facebook account, go to the main screen and tap the facebook icon.
  5. Enjoy your second account by logging in!
    This app supports various social media applications such as Instagram, WhatsApp etc.

How to Block Someone on Instagram forever

Instagram is a social media platform for sharing photos and videos with your loved ones and to stay up-to-date what your friends and family also with latest trends. Sometime social media can be a treat to your privacy. You may not want everyone to see what you share on your profile. Knowing how to block someone on Instagram might be useful when you are concerned about your privacy.

You can always make your profile private, so that you have the control of who can follow you. You can accept their follow request, ignore or delete.
However blocking someone on Instagram is pretty simple, with few easy steps you can get it done. The person you block, will no longer able to locate your profile nor will they be notified that you have blocked them. This blocking feature is really useful if you have any annoying friends who you do not like to share your private posts. They will not be able to view your posts or stories. But they can still mention your username in their posts but those mentions will not be displayed in your activity stream as long as that person is blocked.
If you change your mind, you can always unlock them, in order to unblock someone on Instagram you can follow our tutorial on how to unblock someone on Instagram.

How to Block a person using Instagram App

How to Block Someone on Instagram

You can follow the steps on the above image or use the following steps. The App is available for most of the mobile platforms.

  1. Browse to the user’s profile you wish to block. This can be easily done by tapping their username from anywhere within the Instagram app.
  2. Now you should be able to view the user’s profile page. Tap three dots in the right-hands side corner of the screen and the menu should pop up.
  3. On the menu, select Block.
  4. A message will appear, asking if you are sure that you want to block this user. Tap on Block.
  5. Next, a confirmation message will appear, mentioning that the user has been blocked and you can unblock anytime. Tap on OK.

How to Block using a web browser

If you are running on a platform that doesn’t support the app, you can login through website and still block someone.

  1. Open your favorite browser and visit the Instagram website.
  2. Browse to user’s profile which you want to block. This can be done by clicking on their username.
  3. On user’s profile, click on three dots on top right-hand side corner.
  4. A menu should appear. Click on Block this user.
  5. Click on Block.
  6. Last, Click Dismiss on the confirmation message.

I hope you enjoyed our post on how to block someone on Instagram with few easy steps. Stay tuned for more!

×